 NativTap
Before you begin
- Products you show in your app must be active and in the Nativtap sales channel.
- Some blocks need a newer version of your app than the one in the App Store. The editor marks them Needs app version X or later, and publishing shows a warning.
- Video blocks need app version 1.1.0 or newer.
- Pages such as Product and Cart need app version 1.2.0 or newer. The Order note block and the Notifications page need 1.5.0 or newer.
- The View all button is on by default for a new product block; a block you added earlier may have it off. It opens search results on app version 1.5.0 or newer. Older versions open the collection screen.
Open the editor
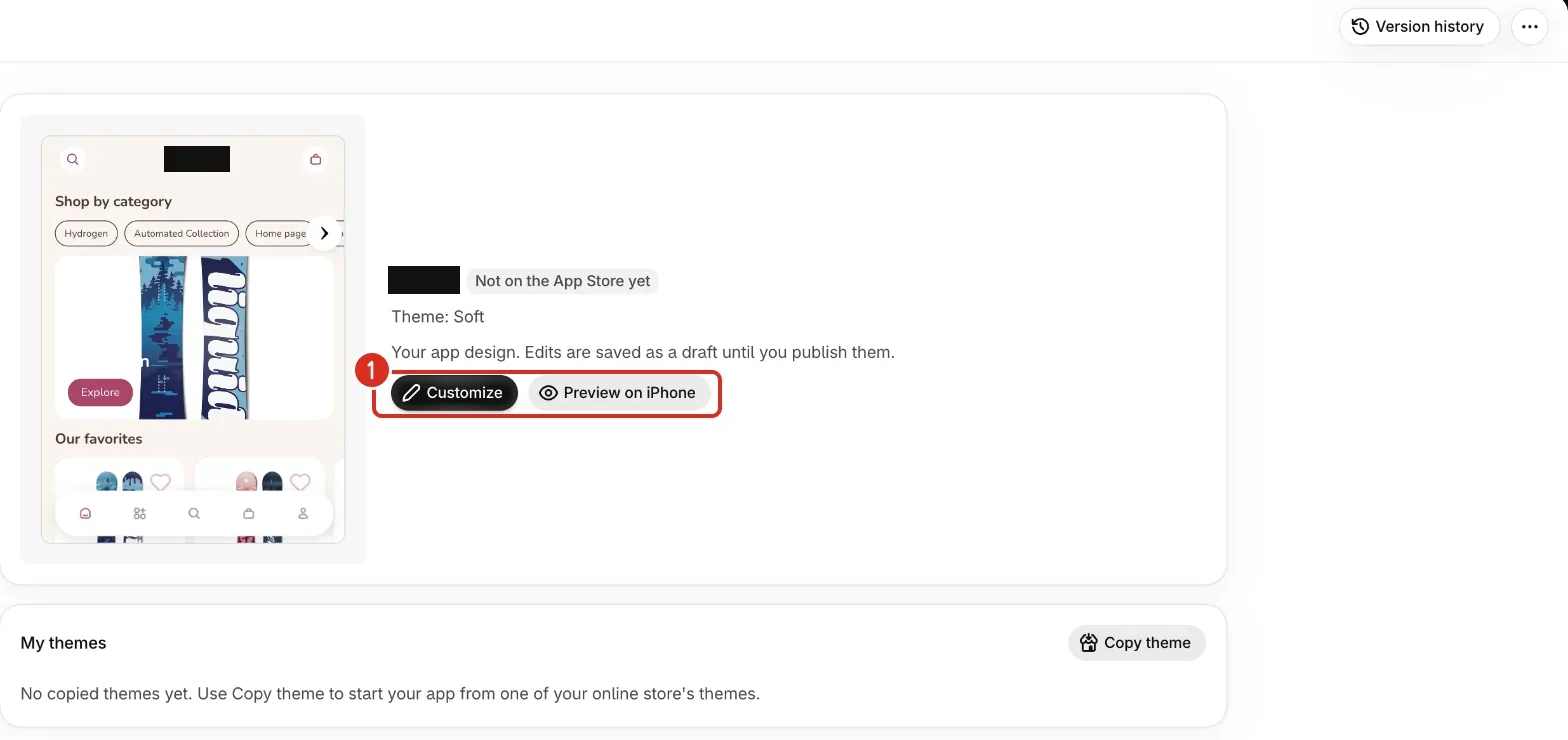
- From your Shopify admin, go to Nativtap > App design. The page shows a preview of your Home screen and the theme your app uses.
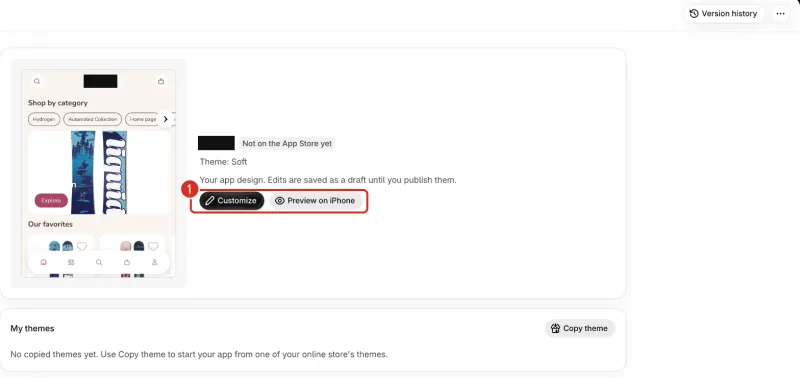
- Select Customize. The editor opens full screen.
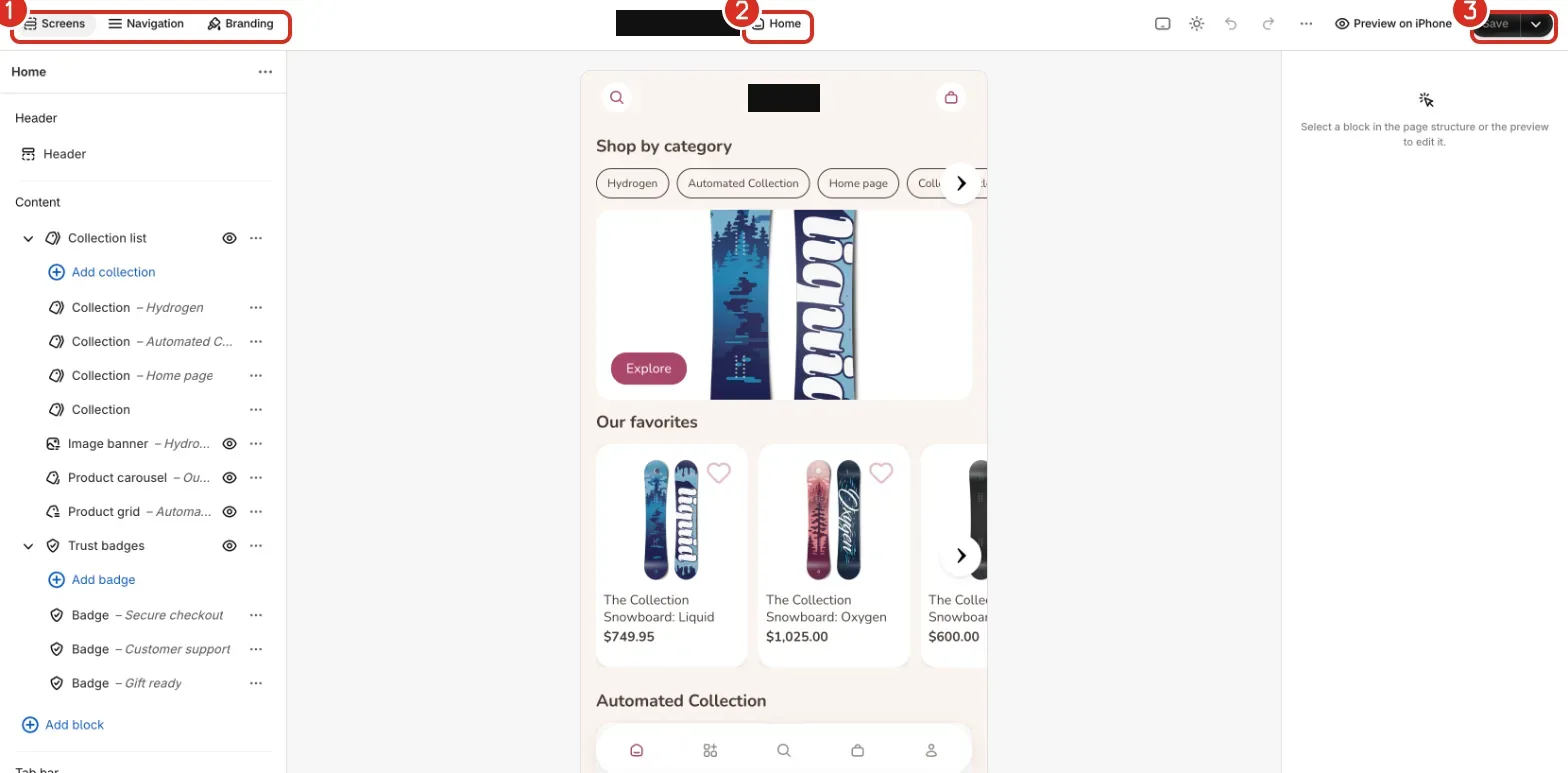
- Find the top bar. Screens, Navigation and Branding switch the panel on the left. The screen picker names the screen you are editing, and Save is on the right.
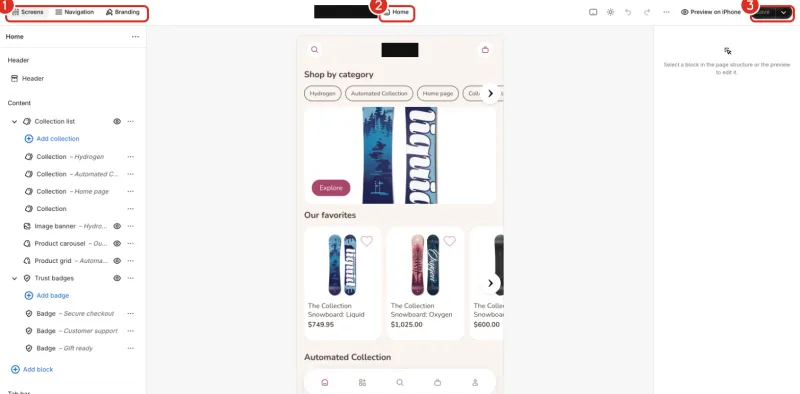
1: Switch between Screens, Navigation and Branding. 2: The screen picker. 3: Save, and the arrow for Save and publish. - Select a block in the page structure or in the preview. Its settings open in the column on the right.
To start from a copy of your online store or from a theme, see Start your app design. To put products in the Nativtap sales channel first, see Publish your products to the app.
Choose a screen
- Select the screen picker in the top bar. It shows Home until you pick another screen.
- Select the screen to edit. After Home come your landing pages, then Product, Collection, Collection list, Search, Cart, Account, Wishlist and Notifications. Type in Search screens to filter the list. Wishlist shows only while Wishlist is on.
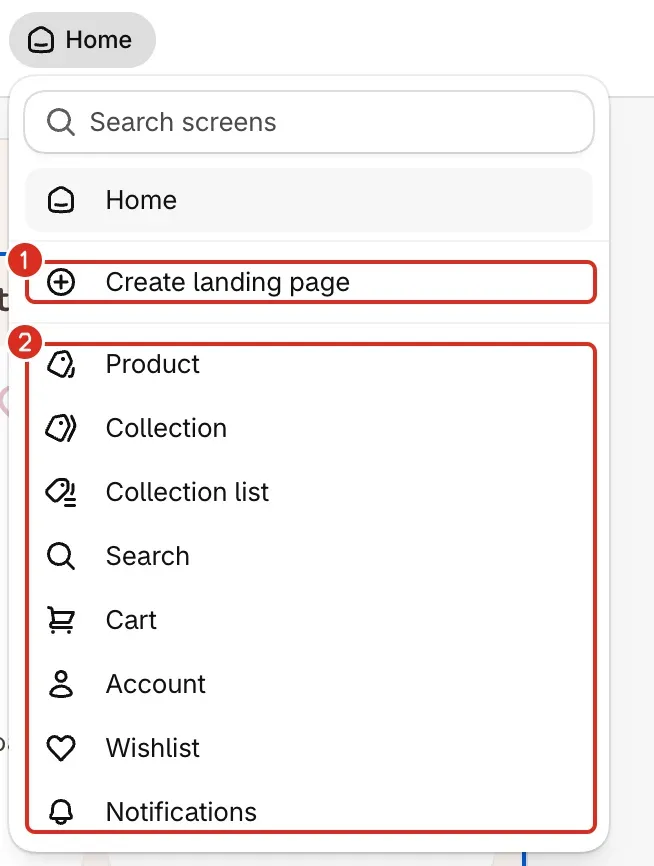
1: Create landing page. 2: Product, Collection, Collection list, Search, Cart, Account, Wishlist and Notifications. - To make a landing page, select Create landing page. Enter a name under New page name, then select Add page.
A page such as Product applies to every product the app opens. Landing pages open from links and tabs, for example a sale or a lookbook, and you can have up to 3. Notifications lists the push notifications you sent in the last 30 days, and shoppers open it from the bell in the header or from a tab.
Add a block
- In the page structure on the left, select Add block.
- Find a block with Search blocks, or scroll the groups: Products, Images, Promotion, Text and layout, and Media (Video). Point at a block to see a preview and a short description.
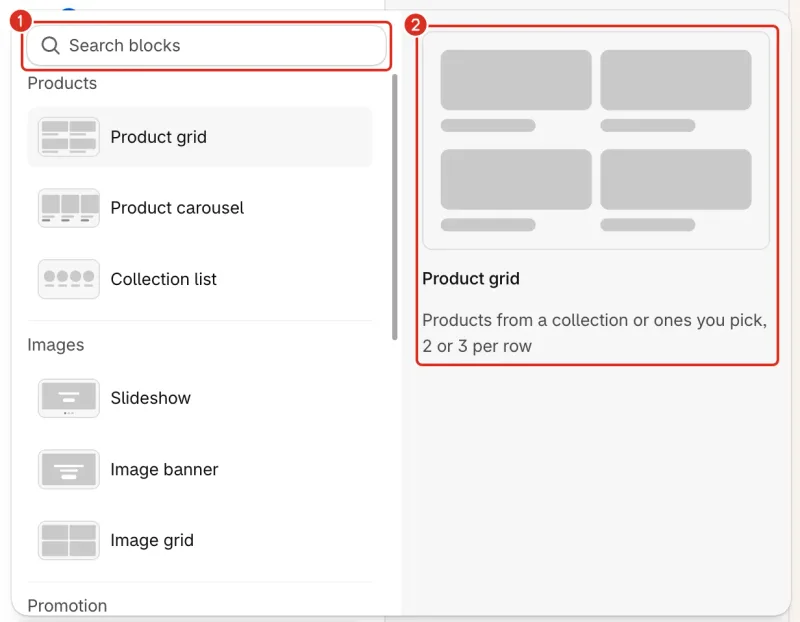
1: Search blocks. 2: A preview and a short description of the block under the pointer. - Select the block. It is added at the end of the page, or where you selected a + button, and its settings open on the right.
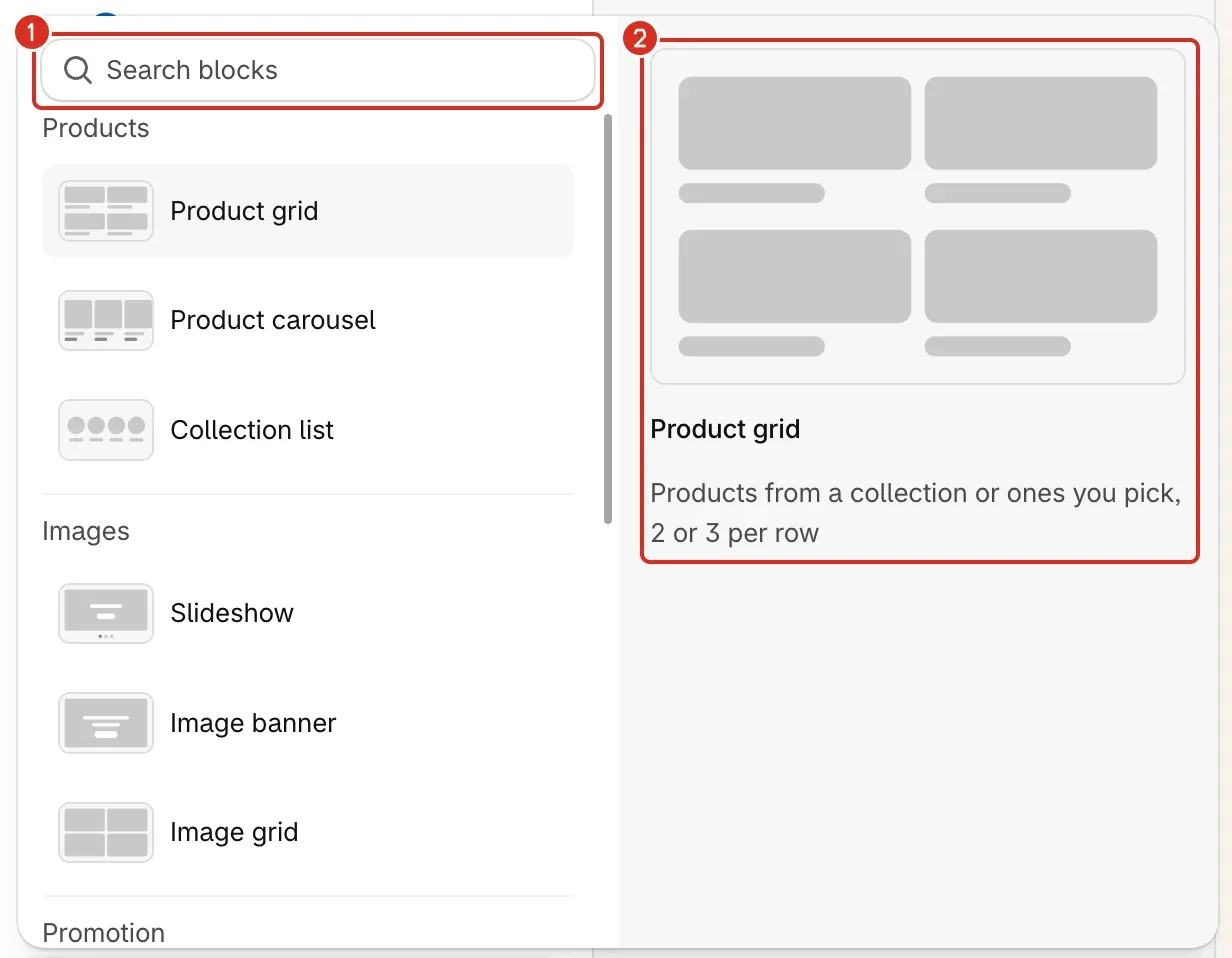
A page holds at most 40 blocks. On the Cart screen, the list also has a Cart group. See Add an order note to your Cart.
| Group | Blocks |
|---|---|
| Products | Product grid, Product carousel, Collection list |
| Images | Slideshow, Image banner, Image grid |
| Promotion | Countdown banner, Announcement bar, Trust badges |
| Text and layout | Text, Spacer / divider |
| Media | Video |
A Video block shows a YouTube video: paste its link (youtube.com, youtu.be or Shorts). Shoppers tap it to play. The Cover image comes from YouTube, and you can replace it.
Change and arrange a block
- To add a block between two others, point at a block in the preview. A + button shows on its top and bottom edge. Without a mouse, the + buttons show on the selected block.
- For a Product grid or a Product carousel that shows a collection, turn View all button on or off. Change its text under Button label, up to 20 characters.
- Turn Show sale badge on or off to show or hide the sale badge on product cards.
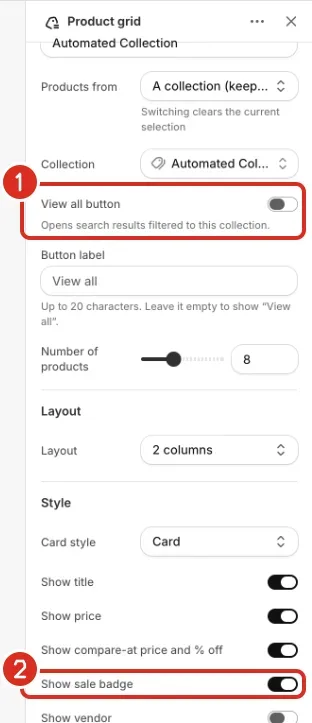
- Use the icons under the selected block in the preview to duplicate, hide or remove it. You can undo a removal.
- Drag a block to a new place in the page structure or in the preview. In the page structure, press Alt+↑ or Alt+↓ to move the selected block with the keyboard.
Add an order note to your Cart
- Open the screen picker and select Cart.
- Select Add block. The Cart group lists Order note. Select it. It goes between Cart items and Subtotal and checkout.
- Set Style to Open or Collapsed. Change Heading and Placeholder if you want other words.
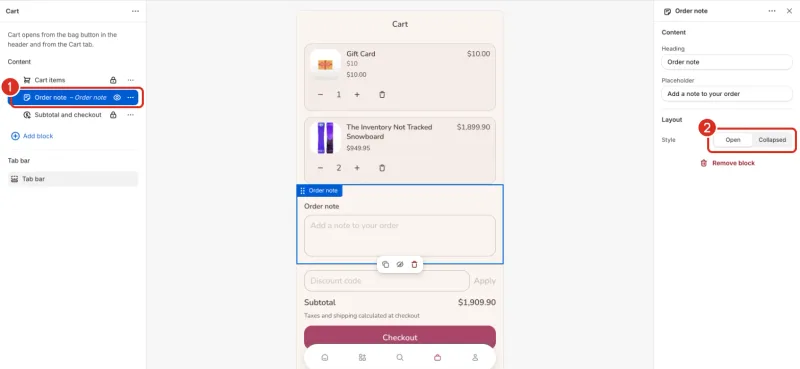
1: The Order note block. 2: Open or Collapsed.
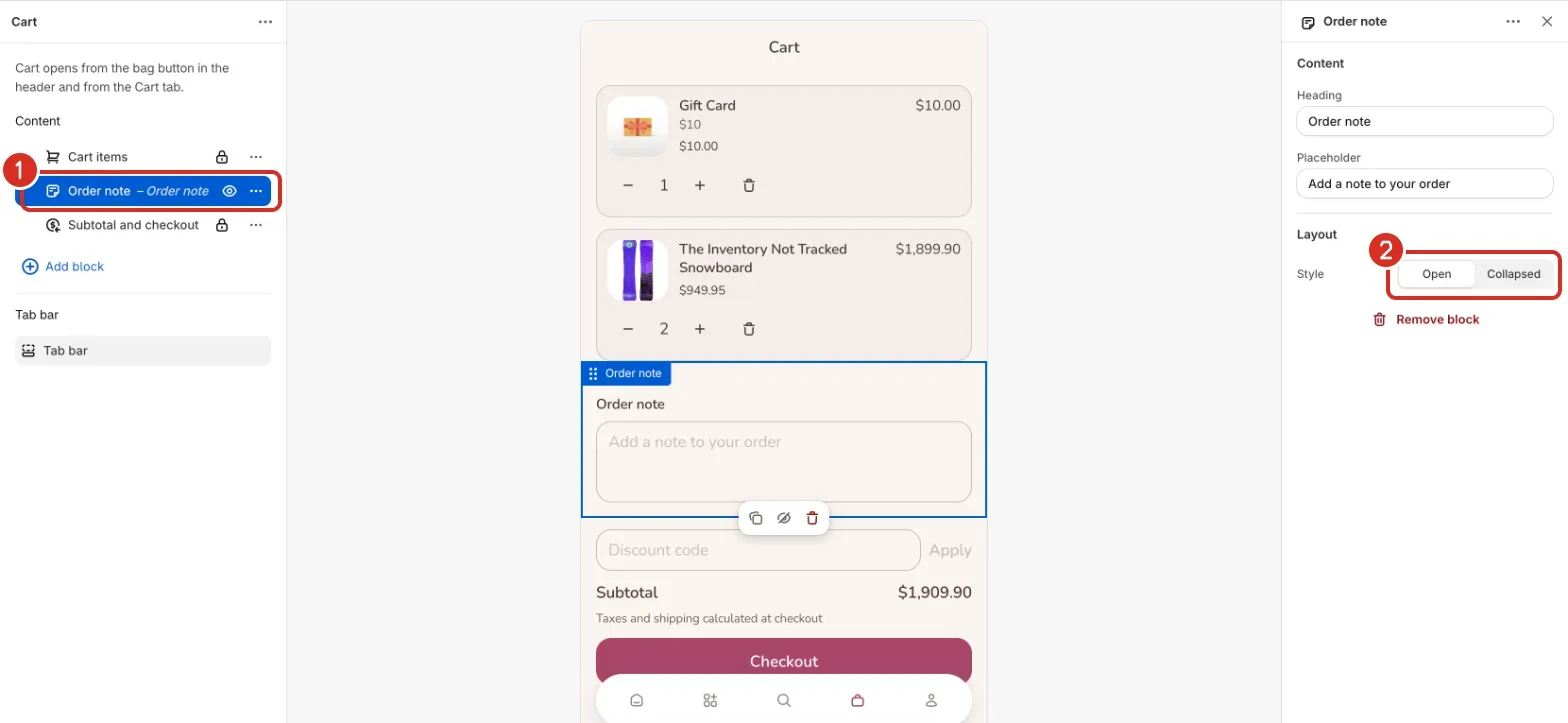
Open shows a box with the heading above it. Collapsed shows one row with the heading and a plus, and the box opens when a shopper selects it. A cart has one Order note.
Set up the header and tab bar
- Select Navigation in the top bar. The panel lists Header and Tab bar, which are the same on every page.
- Select Header. Under Show in the header, turn Show logo, Show search and Show cart on or off.
- Turn on Show notifications to add a bell that opens the Notifications page. A dot appears when there are new notifications.
- Select Tab bar. Change the label, icon or link of a tab, or select Add tab. The tab bar keeps 3 to 5 tabs.
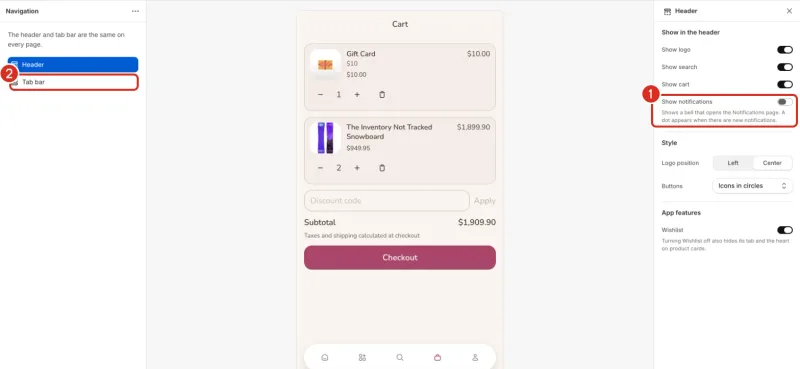
1: Show notifications. 2: Tab bar.
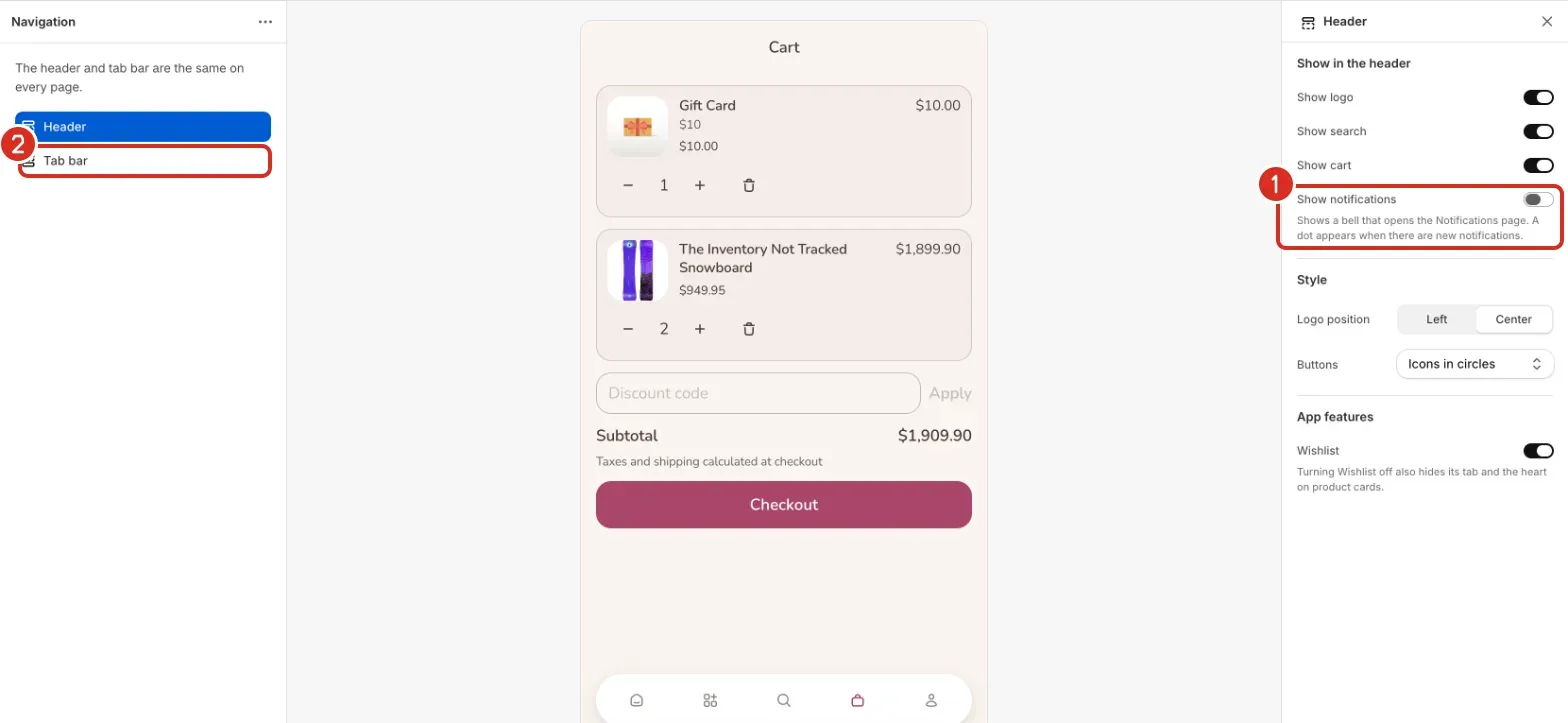
Under Style, set Logo position and Buttons. Under App features, Wishlist turns the Wishlist screen on or off. Turning it off also hides its tab and the heart on product cards.
Select Branding for your logo, colors, font and corners. See Set your colors, fonts and corners. To change the whole look at once, apply a theme from the App design page. See Choose and copy a theme.
Save and publish
- Select Save, or press ⌘S (Ctrl+S on Windows). The editor does not save as you work. Select Save to keep your edits. Save is off when there is nothing to save.
- Select the arrow next to Save, then select Save and publish. Nativtap saves your unsaved edits, then publishes them.
- Wait for the message Published version N. No new build needed. N is the number of the version in Version history.
Publishing can show a yellow banner, Published with warnings. The version is published, and the banner lists what to check, for example a block that needs a newer app version.
Fix a problem that stops publishing
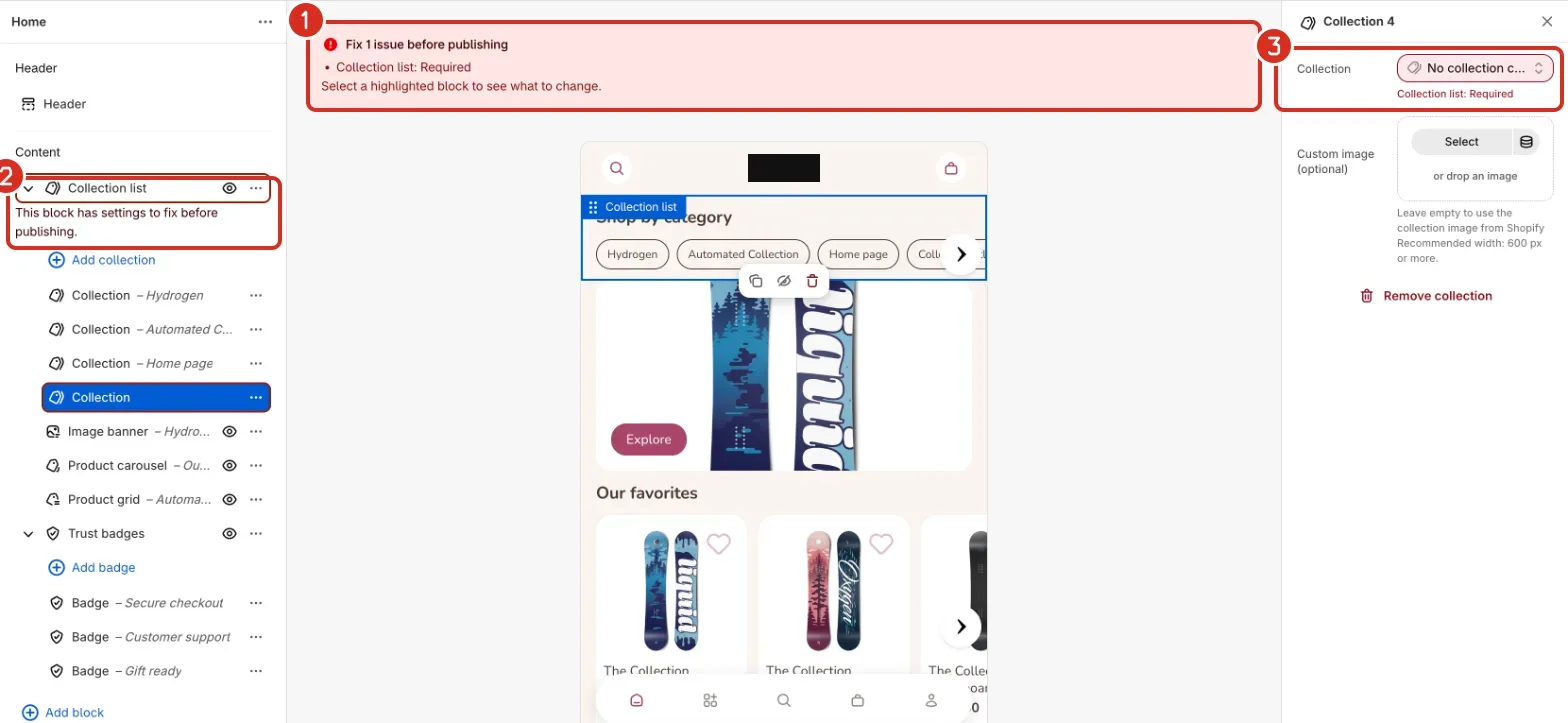
- Read the red banner at the top of the preview. It says Fix 1 issue before publishing, and the number follows the number of problems.
- Select the block outlined in red in the page structure. It says This block has settings to fix before publishing.
- Change the setting that is marked in the settings column.
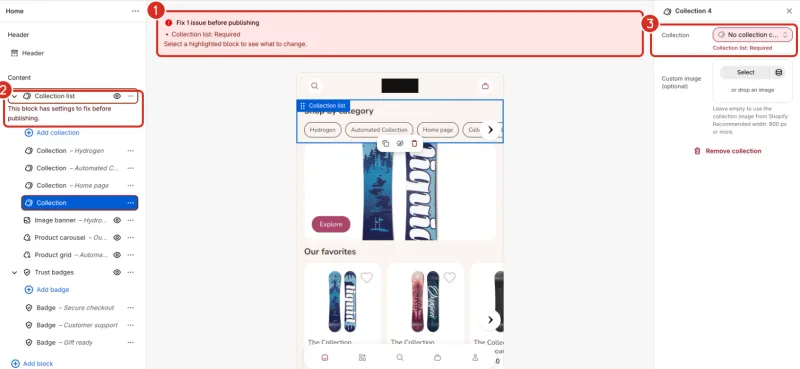
1: The banner. 2: The block with a problem. 3: The setting to fix. - Select Save and publish again.
Preview on your iPhone
- Select Preview on iPhone in the top bar. Nativtap saves your draft first, then shows a QR code.
- Scan the QR code with your iPhone camera. It opens the draft in the Nativtap Preview app. Anyone with the code can view the draft for 10 minutes.
- Select Copy link to copy the link of the preview, or Refresh for a new code. Expires in shows the time left.
The same Preview on iPhone button is on the App design page.
Work on a narrow screen
When the editor window is narrower than about 670 px, the preview moves to the top and the three panels move to a bottom sheet. Drag the handle of the sheet to make it taller or shorter, or select the handle to fold it. On a narrow window, Undo, Redo and Preview on iPhone move into the More actions menu.
Undo and revert changes
- The Undo and Redo icons are in the top bar, before the More actions menu. Press ⌘Z (Ctrl+Z on Windows) to undo and ⇧⌘Z (Ctrl+Shift+Z) to redo.
- Open the Page actions menu, the three dots at the top of the page structure. Revert page to published version drops your unpublished changes to this page, and other pages keep theirs. Revert header and tab bar drops your unpublished changes to the header, tab bar and Wishlist setting. A landing page also has Delete page.
- Open the More actions menu, then select Keyboard shortcuts to see every shortcut.
Restore an earlier version
- On the App design page, select Version history.
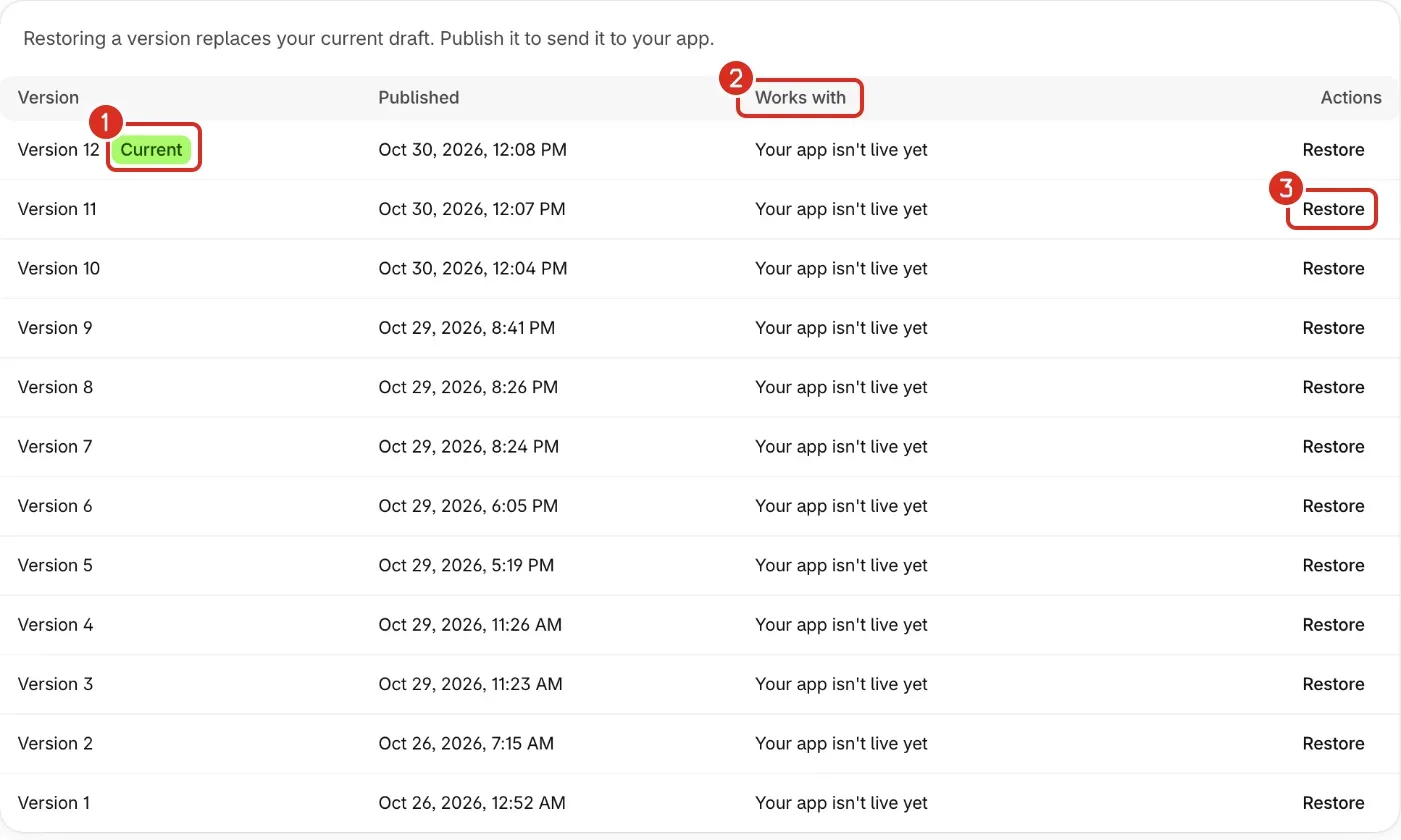
- Find the version in the table. The newest is marked Current. Works with says Works with your live app, Needs app version X or later or Your app isn't live yet.
- Select Restore on a version, then select Replace draft. Your current draft is replaced by that version, and a message says Version N restored as your draft.
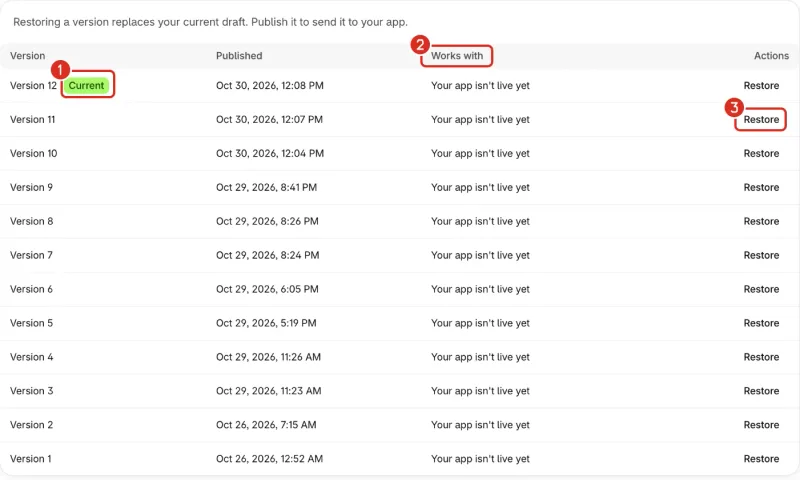
1: The Current version. 2: Works with. 3: Restore. - Open the editor and select Save and publish when you want the version live. The live app does not change until you publish.
Common problems
- Another tab or staff member changed this draft
- Select Reload editor to continue from the latest draft. Changes you made here since the last save can't be kept. Publishing is paused until you reload.
- This draft is too large to save
- Remove some blocks or slides, then try again. Publishing is paused until the draft is saved.
- Some settings can't be saved
- Check the highlighted fields in the selected block. Publishing is paused until the draft is saved.
- Changes aren't saved yet
- Check your connection, then select Save again.
- Fix 1 issue before publishing
- The number follows the number of problems. Select a highlighted block to see what to change. The list can say "Product is not available in the Nativtap sales channel" or "Collection is not available in the Nativtap sales channel". For a product, make it active in Shopify and add it to the channel. For a collection, make it available on the Nativtap sales channel in Shopify. Then select Save and publish again, because publishing checks the channel each time. Or remove it from your app. "Product no longer exists in Shopify" and "Collection no longer exists in Shopify" mean it was deleted: choose another one.
- Your store is still being connected
- The full message says "Your store is still being connected. Try again in a minute."
- Publishing didn't finish
- Your app still shows the last published version. Try again in a minute.
- Couldn't create a preview
- The message says "We couldn't create a preview. Try again." Select Refresh. If it says "Your latest changes aren't saved yet. Fix the save problem, then refresh.", fix the save problem first. If it says "Publishing is in progress. Refresh once it finishes.", wait for the publish to end.
- This page has too much content for the app to load smoothly
- Remove or hide some blocks on that page. This is a warning, and publishing still works.
- This draft changed elsewhere
- Your draft changed in another tab or by another staff member. Reload the editor, then publish again.
- Someone else published at the same time
- Your draft wasn't published. Try again.
- Wait a moment before publishing again
- The banner says how many seconds to wait. Select Save and publish again after that.
- Publishing is paused for your store
- Close the editor and use Contact support on the Home page. See Contact support.
- A page can have at most 40 blocks
- Remove a block to add another.
- You can have up to 3 landing pages
- Delete a landing page to add another. Open it, then use the Page actions menu and select Delete page.
- The tab bar has 5 tabs, the most it can have
- Remove a tab to add another. The tab bar also needs at least 3 tabs.
- My video doesn't play.
- Check that the video is public or unlisted and that its owner allows embedding on other sites. In YouTube Studio, this is the Allow embedding setting under Show more.
Related
Something wrong or out of date on this page? Tell us by email.
Still stuck?
Send us the exact message you see, and what you already tried.