 NativTap
Before you begin
- Connect your Apple account first. Until your App Store Connect key is connected, a banner called Connect your Apple account sits at the top of the App submission and App Store pages, with a Connect Apple account button. Then link your App Store app. The article Connect your Apple account shows how.
- Finish the three tabs that feed Apple: App listing, App Review Information and App Privacy. Nativtap won't create a release while required listing fields are empty.
- You can make 4 builds a month. The month is the calendar month in your store's time zone, and the message that tells you the limit is reached gives the date more builds open up. A build that fails on Nativtap's side doesn't count, and neither does a cancelled release whose build hasn't started. A build that fails because of something on your side does count.
- Some steps happen in App Store Connect and need a role there. The section Before you submit says which.
- Your first release carries everything. After that, the article Know when you need a new release says which changes need a release.
Open the Releases tab
- From your Shopify admin, go to Nativtap > App submission.
- In the App Store card, select Manage App Store. The Google Play card says Coming soon and its button is off.
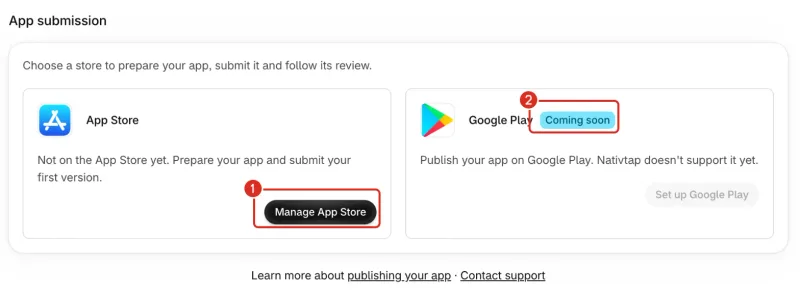
1: Manage App Store. 2: Coming soon. - Select the Releases tab. The page has five tabs: Releases, App listing, App Review Information, App Privacy and Deletion requests.
- Read the badges on the tabs. A badge such as 1 to fix counts what is left to finish on that tab.
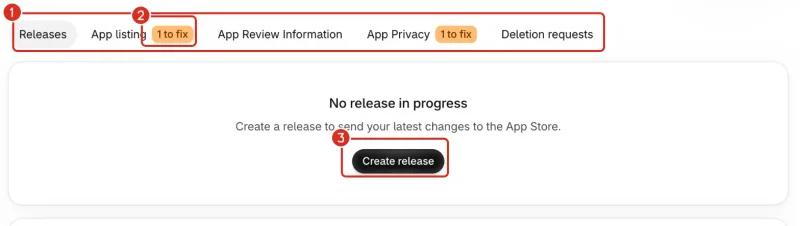
1: The five tabs. 2: How many things are left to fix. 3: Create release.
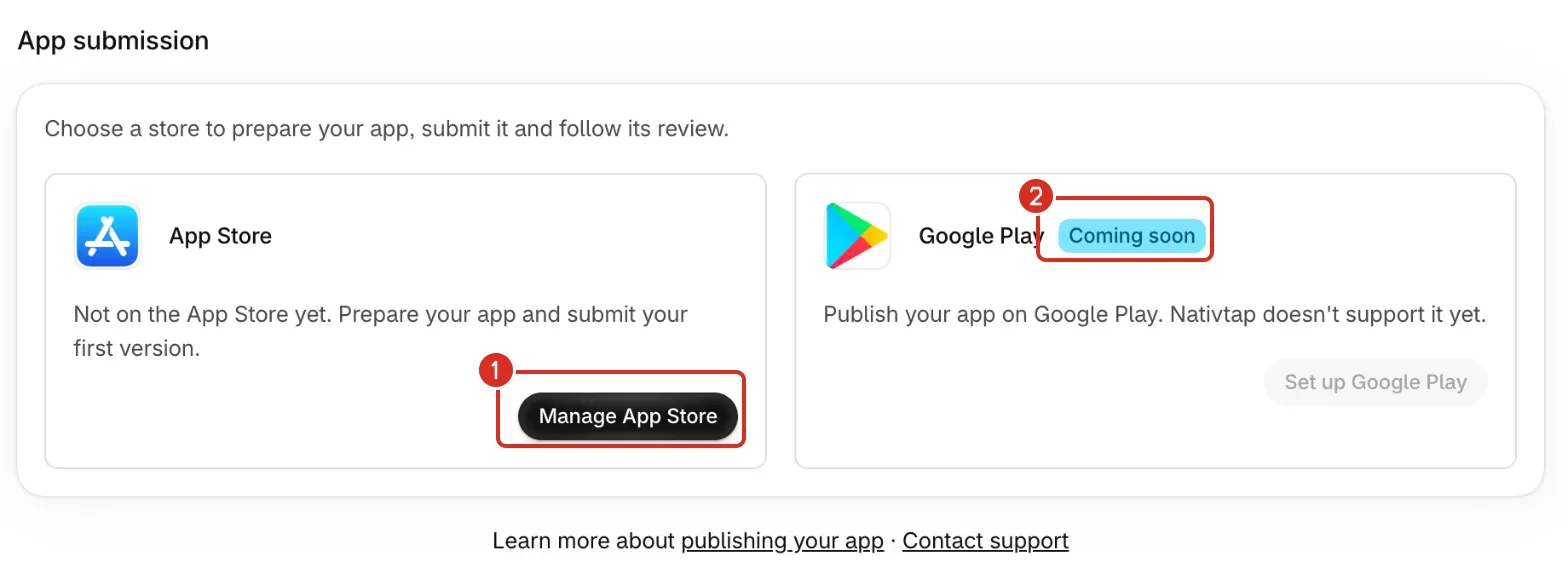
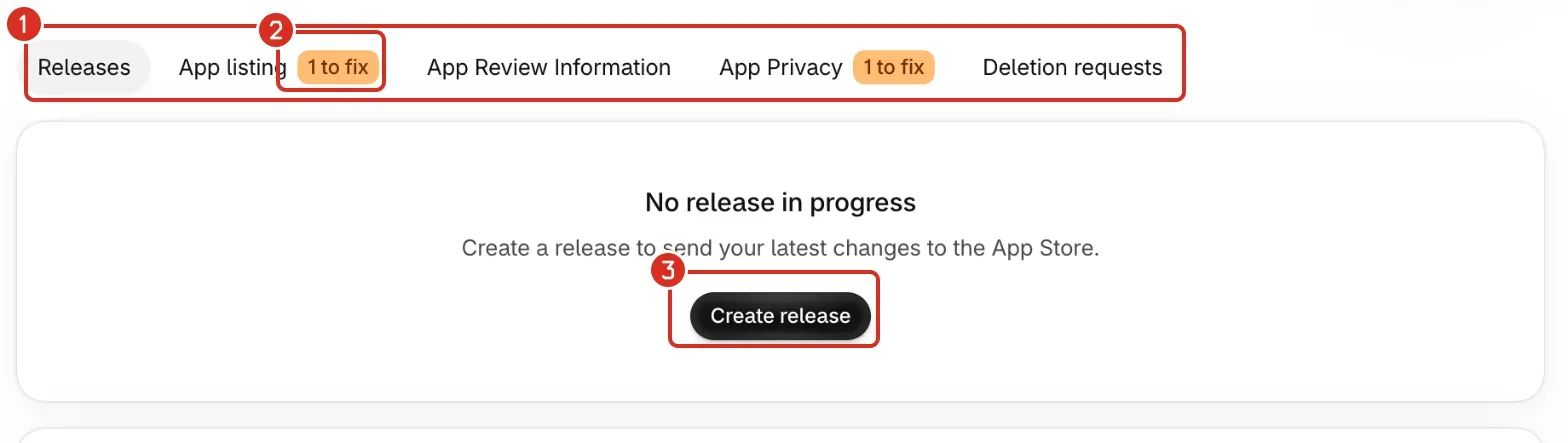
Before your first release the card says No release yet. It says No release in progress when every earlier release was cancelled.
Create a release
- On the Releases tab, select Create release. Before your first release it is in the empty card. After that it is on the version card, next to the status badge.
- Read the dialog. Its title is Create version followed by a number. Nativtap picks the next App Store version number for you.
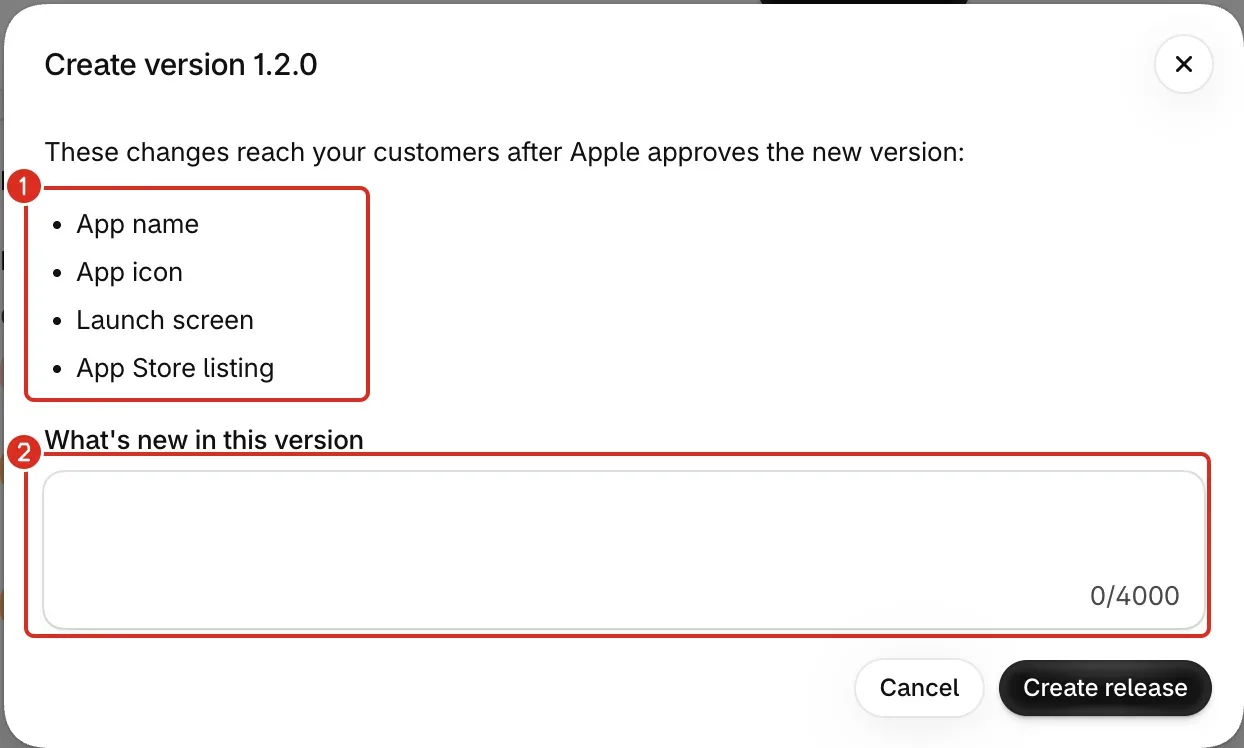
- Read the list under These changes reach your customers after Apple approves the new version:. It names each change since your last release: App name, App icon, Launch screen, App Store listing, and a line that starts with Nativtap and a version when Nativtap has a new version of the app code.
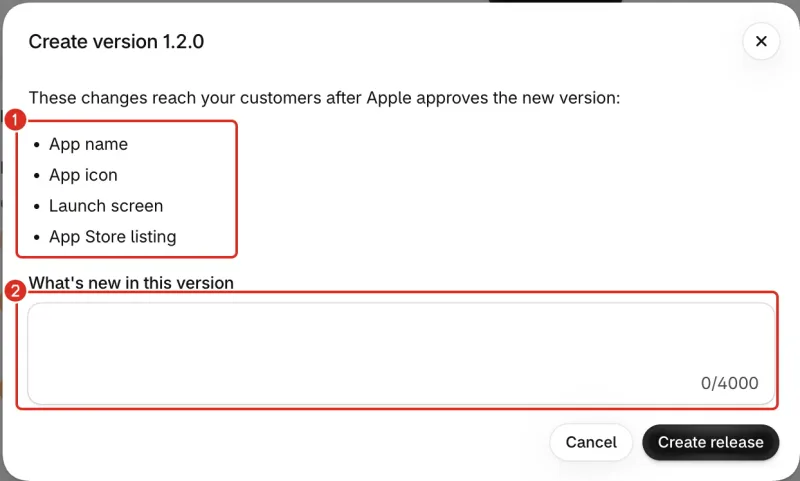
1: What changed. 2: What's new in this version. - Write What's new in this version. It holds up to 4,000 characters.
- Select Create release. The dialog closes and a message says Release created. Building now.
Read why a release can't be created
The Create release button on the version card stays on, so you can always open the dialog. For most reasons the button turns plain instead of dark, and the dialog says why. When nothing has changed it stays dark, and the dialog says so. The Create release button inside the dialog is grey.
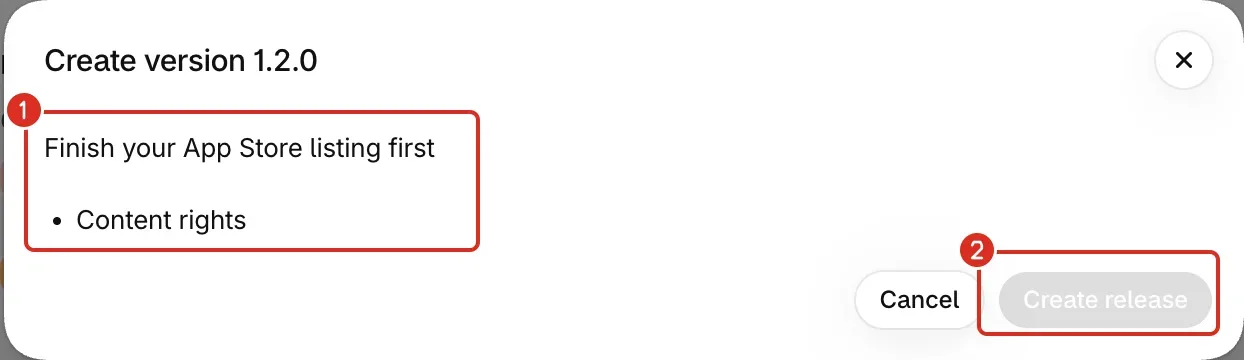
In this dialog, Nativtap says Finish your App Store listing first and lists the listing fields that are still empty. Another release that is still on its way gives a different message.
The dialog shows the first reason Nativtap finds. If you create a release and Nativtap refuses, the message shows under What's new in this version. These are the reasons, with what to do:
| The dialog says | What to do |
|---|---|
| Connect your Apple account first | Connect your App Store Connect API key. |
| Connect your App Store Connect app first | Finish the App Store app card in Settings > Apple account. |
| Fix the Apple account issue first | Open Settings > Apple account to see the problem. Releases stay off until it is fixed. |
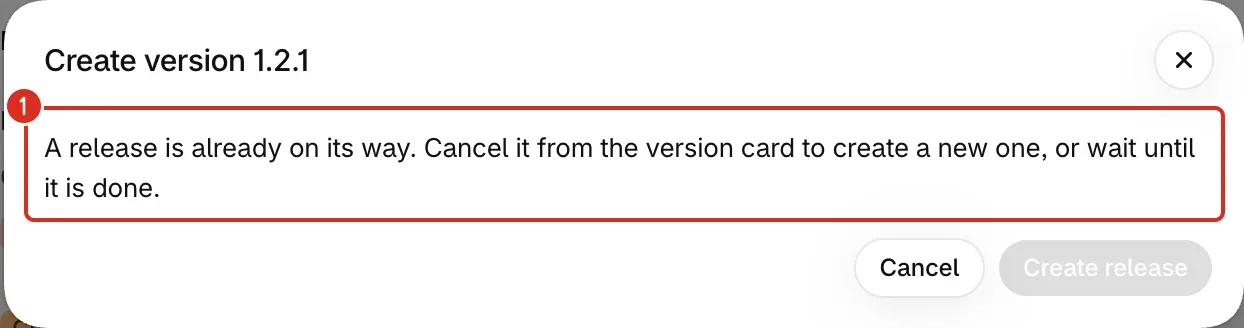
| A release is already on its way. You can create the next one when it is done. | Only one release can be open. Follow it on the Releases tab. |
| A release is already on its way. Cancel it from the version card to create a new one, or wait until it is done. | Cancel it, as the next section says, or wait. |
| Add your app name and icon first | Set both on the App listing tab. |
| Publish your app content once before creating a release | Publish your design from the editor, or select Publish on Home. |
| A build is already on its way | Wait. Follow it on the Releases tab. |
| Builds are paused for this store. Contact support | Ask support, as the paragraph below says. |
Connect your Apple account covers the first three reasons. Set your app's name, icon and launch screen covers the name and icon. When the dialog says to contact support, Contact support lists what to send.
Four more reasons are in Common problems below: nothing changed, an unfinished listing, no builds available and the monthly limit.
Follow the release
- Stay on the Releases tab. The version card lists five steps: Build, Apple processing, Submit for review, App Review and Live on the App Store. The page looks again by itself while Nativtap or Apple is working.
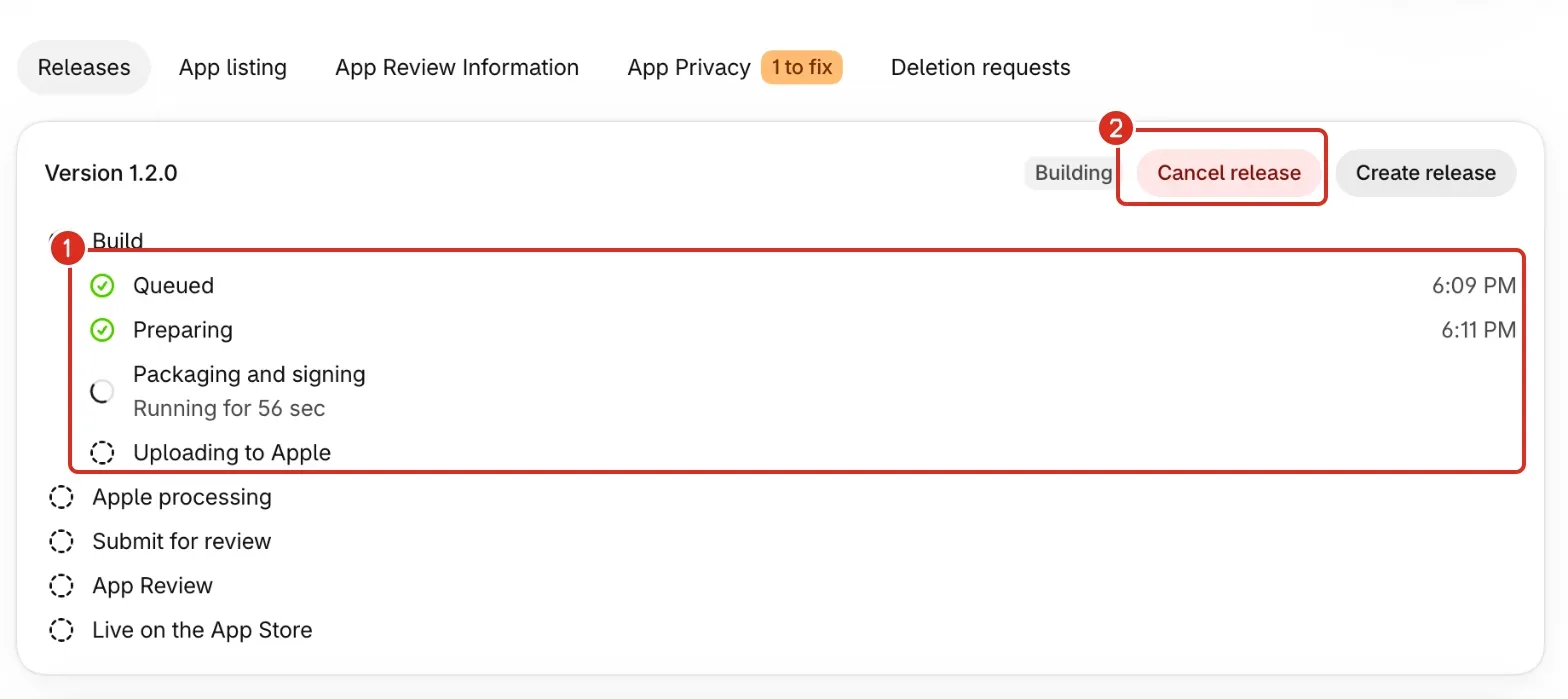
- While Build runs, read its four sub-steps: Queued, Preparing, Packaging and signing and Uploading to Apple. The one in progress has a clock, such as Running for 2 min. Queued says Waiting for and a time.
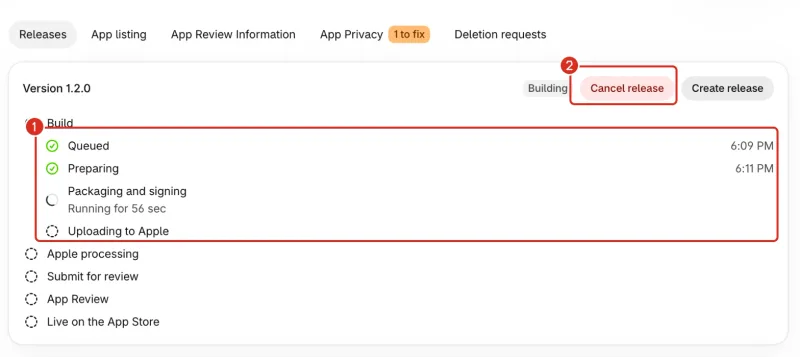
1: The four steps of the build. 2: Cancel release. - Read the badge at the top right of the version card. It tells you where the release is:
| Badge | What it means | What you do |
|---|---|---|
| Waiting to build, Building | Nativtap is building your app. | Wait. You can cancel. |
| Processing | Apple is processing the uploaded build. | Wait. You can cancel. |
| Ready to submit | Apple has the build and Nativtap has prepared the version. | Finish Before you submit, then submit. |
| Waiting for review, In review | Apple has the version. | Wait for Apple's decision. |
| Approved | Apple approved the version. | Wait for it to go live. |
| Live | The version is on the App Store. | Select View on the App Store. |
| Build failed | The build stopped. | See "Fix a build that failed" below. |
| Rejected | App Review rejected the version. | Follow the link below the table. |
If the badge says Rejected, Fix an Apple rejection says what to do.
The Earlier versions card under the version card lists your older releases with their version, status and the date you created them. A release you cancelled shows Cancelled there, and the version card moves on to the newest release that isn't cancelled.
Cancel a release
- On the version card, select Cancel release. The button shows while the badge says Waiting to build, Building, Processing or Ready to submit. It is gone once the version is with Apple.
- Read the dialog Cancel version followed by the version and a question mark. It says the version won't be sent to App Review and that your next release can use the same version number. It ends with one sentence about the build, listed below.
- Select Cancel release to confirm. A message says Release cancelled, build not counted or Release cancelled.
To close the dialog without cancelling, select Keep release instead.
The sentence about the build is one of these:
- Its build hasn't started yet, so it will be stopped and won't count toward this month's builds.
- Its build is already running, so it will finish anyway and still counts toward this month's builds.
- Its build still counts toward this month's builds.
Cancelling only changes the release in Nativtap. It doesn't remove anything from App Store Connect.
Fix a build that failed
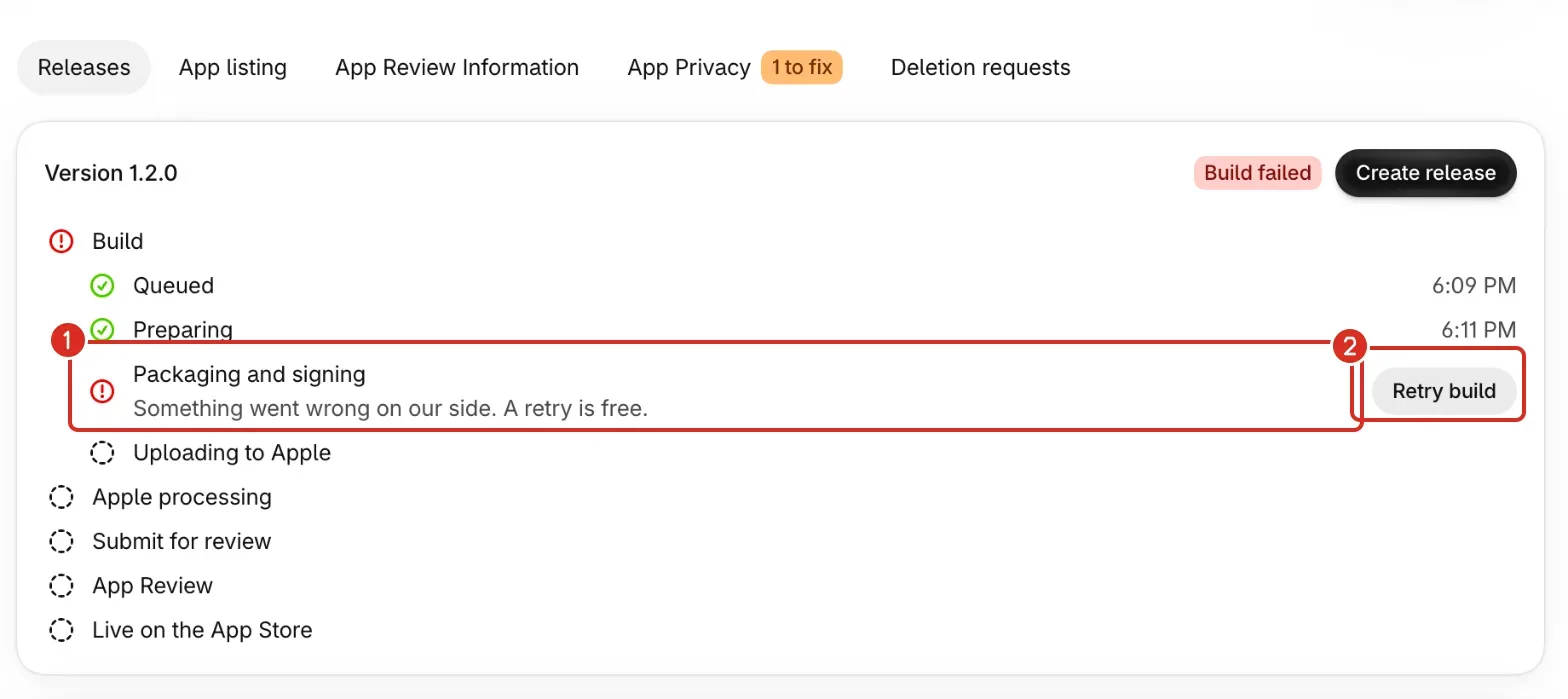
A failed build shows a red Build failed badge. The Build step and the sub-step that stopped are red, and a note under it says what to do.
- Read the note under the red step.
- If it says Something went wrong on our side. A retry is free., select Retry build. A message says Building again, and the retry doesn't count toward your 4 builds.
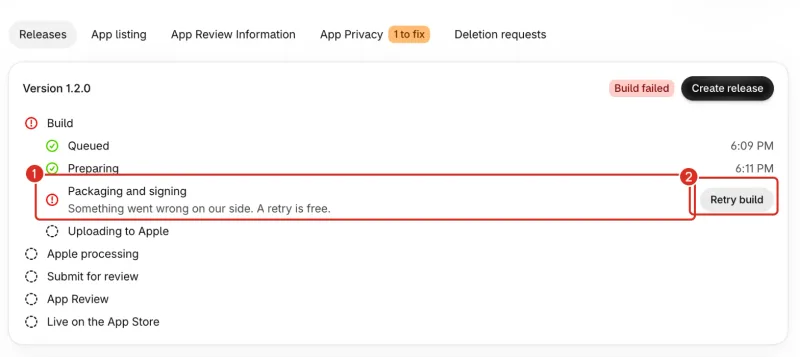
1: The step that failed. 2: Retry build. - If the retry fails too, the note says Failed again on our side. We'll fix it with you. and Contact support replaces the button. Contact support lists what to send.
- If the note names something on your side, do what it says, then create a new release:
| The note says | What to do |
|---|---|
| Accept the latest agreement in App Store Connect, then create a new release. | The Account Holder accepts it under Business in App Store Connect. |
| Reconnect your App Store Connect API key, then create a new release. | Open Settings > Apple account, select Replace API key and add a new key. |
| Create a Team API key with the App Manager role and reconnect it, then create a new release. | Make the key again with that role, then select Replace API key in Settings > Apple account. |
| Create your app record in App Store Connect, then create a new release. | Finish the App Store app card in Settings > Apple account. |
| Pick a certificate below to revoke, then create a new release. | Follow "Revoke an Apple Distribution certificate" below. |
For the key and the App Store app, Connect your Apple account shows how.
Revoke an Apple Distribution certificate
When your Apple account has too many Apple Distribution certificates, the build fails and lists them. Apple doesn't say which ones Nativtap made, so you decide which to revoke.
- Under the failed Build step, find the Apple Distribution certificates list. Each row shows the name, Expires and a date, and Serial ending and the last six characters.
- Find a certificate you don't use anywhere else. A row with the badge Used by Nativtap has no button, because Nativtap signs your app with it.
- Select Revoke next to it.
- Read the dialog Revoke this certificate?. It says apps already on the App Store aren't affected, that anything else that signs with the certificate, such as Xcode or another build service, stops working until it gets a new one, and that you can't undo it.
- Select Revoke certificate. The row says Revoking… while Nativtap asks Apple. Nativtap looks again for about a minute. If it still says Revoking… after that, reload the page to see the current list.
- When the certificate leaves the list, the card says Create a new release. Select Create release.
Apple says that provisioning profiles containing a revoked certificate become invalid (Apple's help on revoking a certificate).
Before you submit
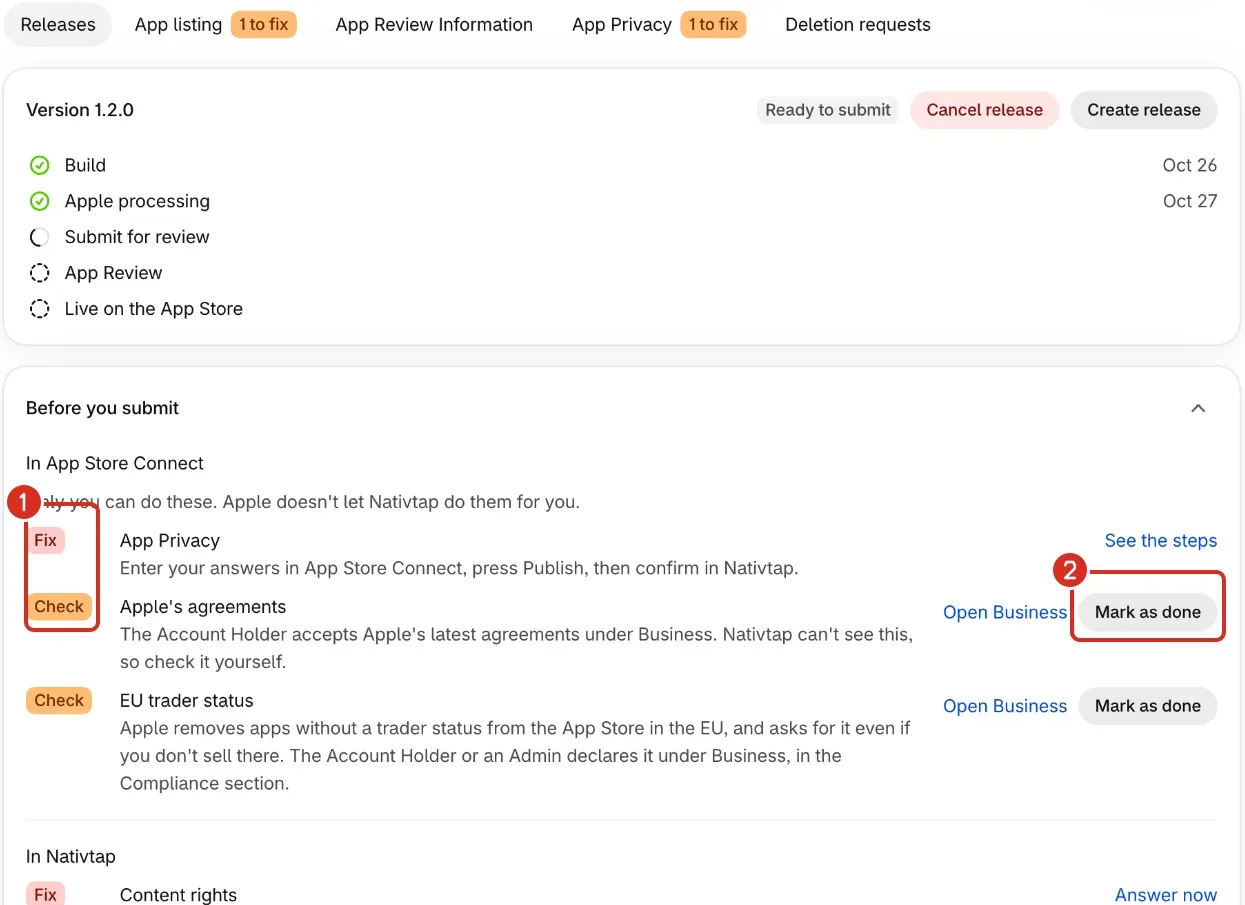
The Before you submit card sits on the Releases tab under the version card, and lists everything Apple needs in three groups. You can fix its lines while the build runs, or before your first release. Submit for review only appears once the badge says Ready to submit, and the card stops listing checks once Apple has the version. A line has one of these marks:
- A green check: done.
- Fix in red: it blocks Submit for review. The line links to the page that solves it.
- Check in yellow: a reminder Nativtap can't verify. It never blocks the button.
- Apple in red: Apple named it when it refused the submission. Fix an Apple rejection covers those.
- On the Releases tab, find the Before you submit card under the version card. If it is folded, select the button at the right of its heading to open it.
- In the group In App Store Connect, find App Privacy. Select See the steps. Answer App Privacy walks through them.
- Find Apple's agreements. Select Open Business. The note on the line says the Account Holder accepts Apple's latest agreements there, and that Nativtap can't see it.
- Back in Nativtap, select Mark as done on that line.
- Find EU trader status. Select Open Business. In App Store Connect, the Account Holder or an Admin declares it, even if you don't sell in the EU (Apple's help on trader requirements).
- Select Mark as done on that line.
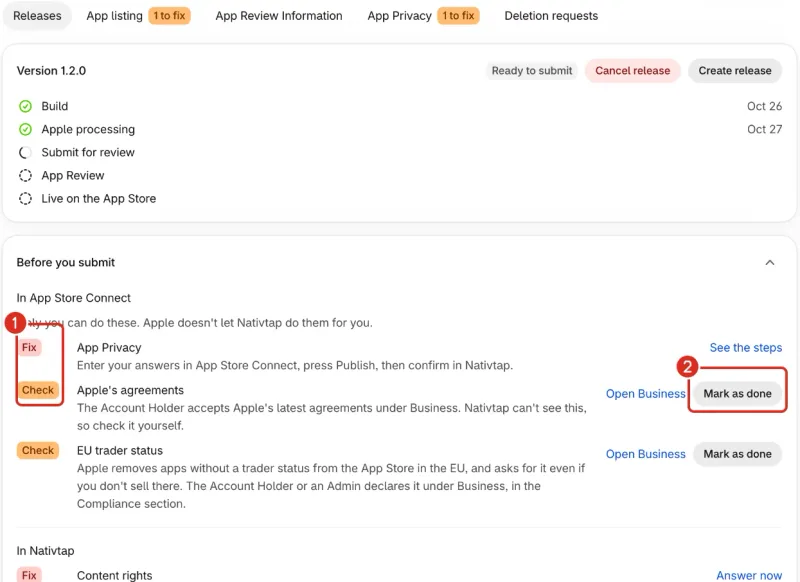
1: The Fix and Check badges. Fix lines block the submit, Check lines you confirm yourself. 2: Mark as done. - In the group In Nativtap, find Content rights. Select Answer now, or Change if you answered. Write your App Store listing explains the question.
- Select the link on each other Fix line and do what it says. The table below covers the common ones.
- Read the note next to Submit for review. It says Fix 3 problems before you submit. with the number of Fix lines left.
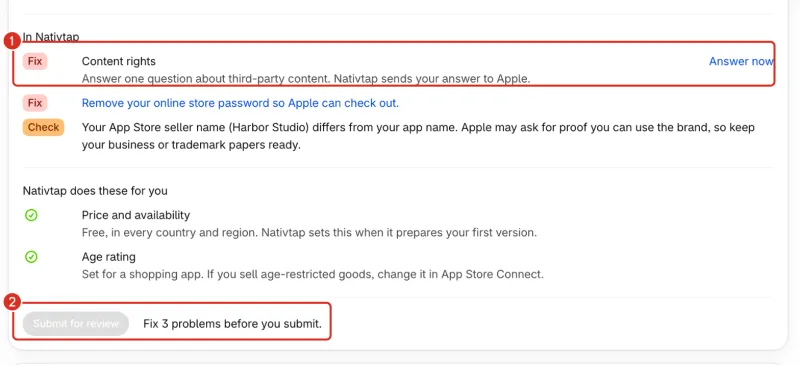
1: A line to fix in Nativtap. 2: Submit for review stays off until every Fix line is fixed. - Select Submit for review. A message says Submitting to App Review. Nativtap checks the list once more first, and the button stays grey while a Fix line is left.
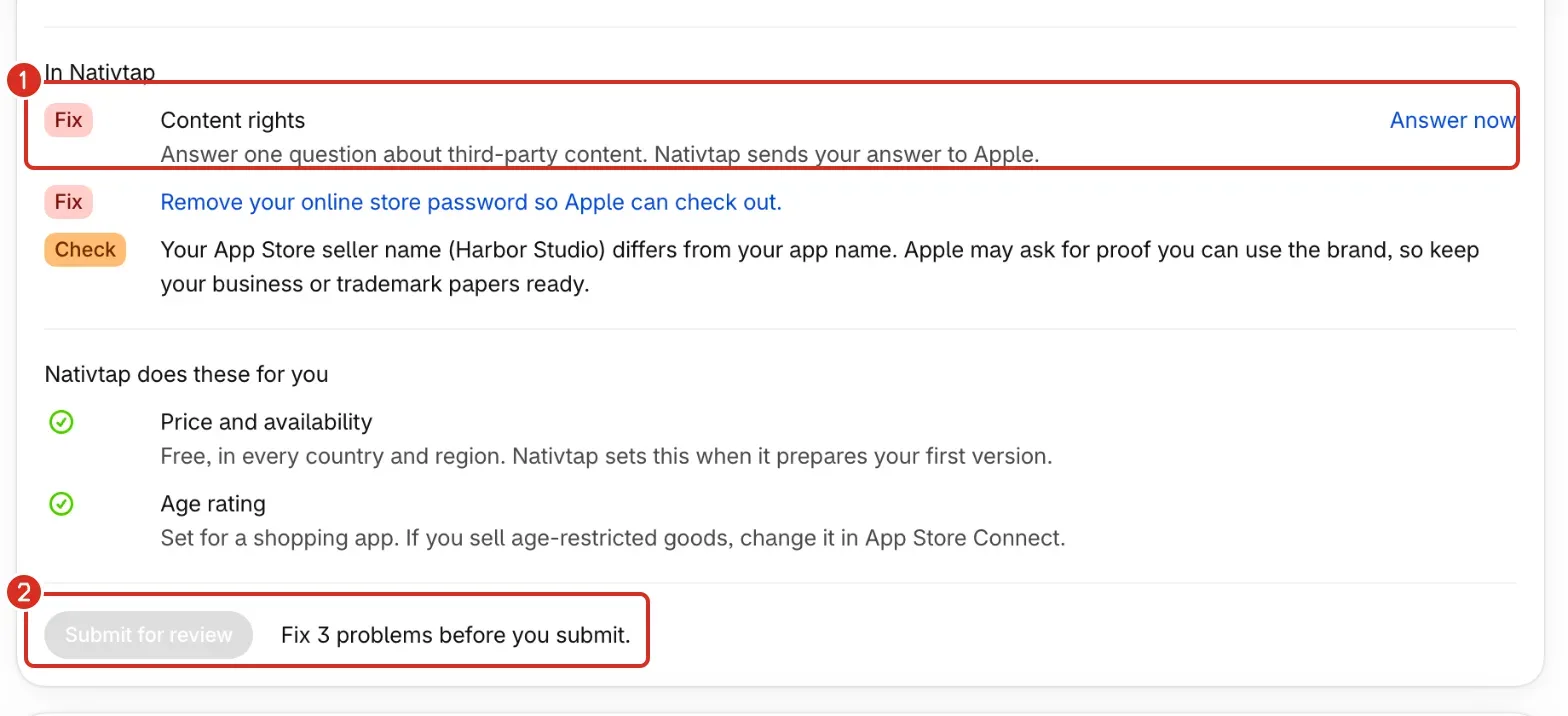
The group Nativtap does these for you shows only for your first version. Price and availability is Free, in every country and region, and Age rating is set for a shopping app. If you sell age-restricted goods, change the age rating in App Store Connect.
For the listing, screenshot, product and editor lines, Write your App Store listing, Create your App Store screenshots, Publish your products to the app and Design your app explain the fixes.
These are the lines in In Nativtap that stop most apps, with the fix:
| The line says | What to do |
|---|---|
| Finish your App Store listing. Fill in every required field. | Fill the fields on the App listing tab. |
| Answer the content rights question in your App Store listing. | Select Answer now in the Content rights line. |
| Add at least 10 products with images to the Nativtap sales channel. | Publish products to the Nativtap sales channel. |
| Add at least 3 blocks to Home and publish. | Add blocks in the editor, then publish. When nothing is published yet, the line says Publish your app content from the editor first. |
| Add at least 3 screenshots. | Add screenshots on the App listing tab. |
| Remove your online store password so Apple can check out. | Remove the online store password. The line opens your Shopify online store preferences. |
| Your store is on the Trial plan. Choose a paid Shopify plan so buyers can check out. | Select a plan in Shopify. The line names your plan, which can also be Development, Paused or Inactive. |
| Turn on new customer accounts so shoppers can sign in to your app. | See Common problems below. |
| Fix the problems with your Apple account first. Open Settings > Apple account to see them. | Open Settings > Apple account. |
| Version 1.0.1 must be higher than the live version 1.0.2. Pick a higher version number. | The line shows your own version numbers. Nativtap picks the number and the dialog has no field for it, so contact support and send the line. |
| Another version is waiting for or in review. Wait for Apple's decision first. | Wait for Apple's decision on that version. |
Other lines, for the app name, icon, links and words Apple rejects, are covered in Write your App Store listing and Set your app's name, icon and launch screen.
Follow the review and the launch
- Stay on the Releases tab. After you submit, the badge says Waiting for review, then In review. Apple decides how long that takes, and Nativtap can't speed it up.
- When the badge says Approved, wait for the version to go live. Apple says it can take up to 24 hours after approval (Apple's overview of publishing your app). Nativtap creates the version with Apple's option to release it automatically after approval, so you don't need to do anything.
- When the badge says Live, select View on the App Store on the last step. It opens your app's page in a new tab.
If Apple rejects the version, Fix an Apple rejection says what to do. To get a later change into your app, Know when you need a new release says whether you need another release.
Common problems
- Nothing has changed since your last release. Edits you publish from the editor reach your app without a new release.
- The dialog found no new app name, icon, launch screen, listing or Nativtap version to send. If you edited blocks, pages, theme or navigation, select Publish instead. Know when you need a new release explains the difference.
- Finish your App Store listing first
- The dialog lists the listing fields that are still empty. Fill them on the App listing and App Review Information tabs, then select Create release again.
- Builds are not available yet. Try again later
- Nativtap has no app build to base your release on right now. Nothing on your side causes this. Try again later, and Contact support if it stays.
- You've used this month's 4 builds. More builds on Dec 1, 2026
- The message ends with your own date, the day more builds open up. You can't create a release until then. If Apple rejected only your listing, Send updated listing to Apple doesn't need a build. Fix an Apple rejection explains it.
- The Build step says "Something went wrong on our side. A retry is free." or "Failed again on our side. We'll fix it with you."
- The first means the build failed on Nativtap's side: select Retry build. The second means the retry failed too: select Contact support. See "Fix a build that failed" above.
- Pick a certificate below to revoke, then create a new release.
- Your Apple account holds too many Apple Distribution certificates for a new one. Revoke one you don't use, as "Revoke an Apple Distribution certificate" above says.
- Your API key can't revoke certificates. Revoke it in your Apple developer account instead.
- The API key you connected to Nativtap isn't allowed to revoke certificates. Revoke the certificate yourself with an Account Holder or Admin sign-in: in your Apple developer account, go to Certificates, Identifiers & Profiles, select Certificates, select the certificate and select Revoke. Apple says those are the roles that can revoke (Apple's help on revoking a certificate). Then create a new release.
- Turn on new customer accounts so shoppers can sign in to your app.
- Your store uses classic customer accounts, which Shopify calls legacy customer accounts, and the app signs shoppers in with the new ones. In Shopify, go to Settings > Customer accounts and select Upgrade in the banner at the top (Shopify's upgrade steps). Shopify's page says to publish your new configuration under Settings > Checkout before you upgrade.
- Fix 3 problems before you submit.
- Submit for review is grey while a Fix line is left, and the number says how many. Do what each line says, as "Before you submit" above explains. If you select Submit for review on an old page, Nativtap shows Fix the items in the pre-submit check first with the lines.
- There is no Submit for review button.
- The card says why instead. Create a release to submit your app. means no release is open. Your build isn't ready yet. You can submit once Apple has processed it. means to wait. Already submitted. Apple is reviewing it. means it is with Apple. Your app is live. Create a new release to submit an update. means you need a new release. Your last build failed. Retry it above, or fix the problem shown above and create a release. means to fix the build first.
- The badge says Rejected, or "Apple can't review this version yet".
- Apple answered after you submitted. Fix an Apple rejection covers both and says whether you need a new build.
- The badge says Approved, but the app isn't on the App Store yet.
- Apple says an approved app can take up to 24 hours to go live (Apple's overview of publishing your app). When the badge changes to Live, View on the App Store appears.
Related
Something wrong or out of date on this page? Tell us by email.
Still stuck?
Send us the exact message you see, and what you already tried.